ClientSpace Knowledge Article
Overview
ClientSpace is our new Client Relationship Management software that will be replacing Salesforce with a focus on efficiency and improved client experience. It offers a unified platform for submitting service tickets, accessing invoices, submitting projects, and reaching the Help Center. This transition aligns us with Vensure Employer Solutions, simplifying our operations and enhancing support through streamlined processes.
Navigation
Accessing Case Management
-
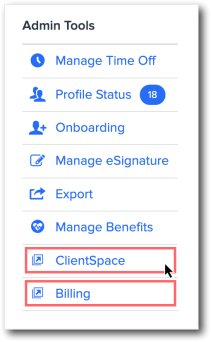
To create and review support cases, select ClientSpace from the Admin Tools menu in Namely. Your ClientSpace homepage will appear in a new window.
Accessing Billing and Project Management
-
To create projects and review invoices, select Billing from the Admin Tools menu in Namely. The Project Services Catalog will appear in a new window. Use the Navigation pane on the left to view your invoices and subscriptions.
Note: Only Trusted Contacts with the Accounts Payable Contact Role assigned will have access to ClientSpace.
Accessing the Help Center
-
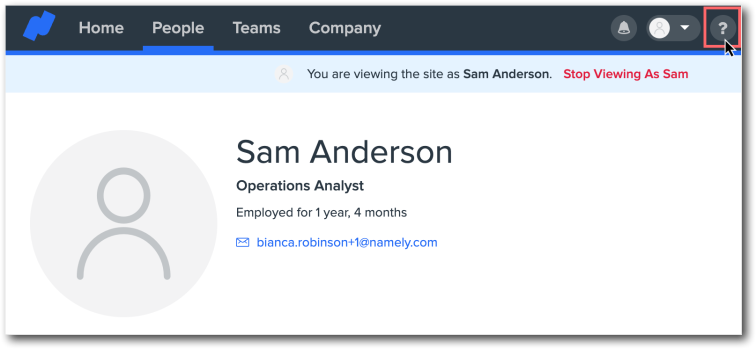
To review knowledge articles, release notes, and reference materials in the Help Center, click the Question Mark in the top-right corner of the Navigation Bar in Namely.
-
The Help Center can also be accessed from the homepage in ClientSpace with the Namely Community Help Documents tile under the Client Listing tile.

Case Management
Creating a Case
-
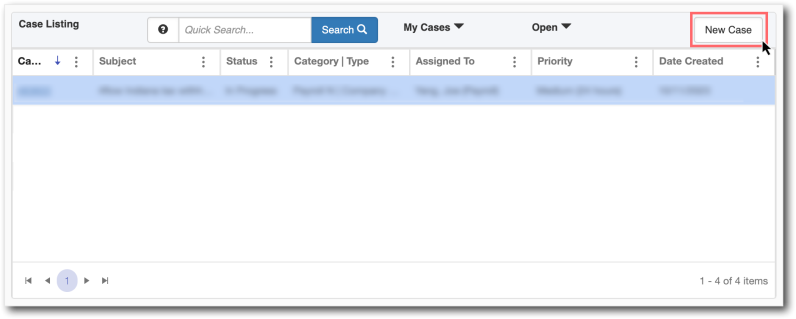
Click New Case in the top-right corner of the Case Listing tile on the ClientSpace homepage.
-
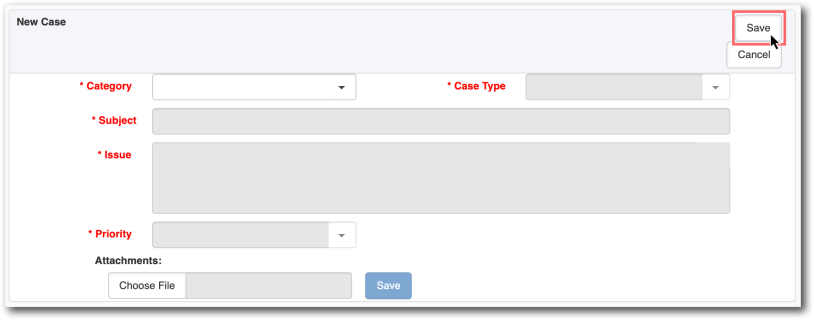
Select a Category and a Case Type from the dropdown options.
Note: If employee time is tracked using the Timesheets feature within Namely Payroll, which is accessible by clicking Timecard / Expenses under Payroll, select Timesheets as the Category. Alternatively, if employee time is tracked using the Namely Time platform, which is accessible by clicking My Timesheets, select Namely Time as the Category.
-
Fill out the Subject and Issue fields explaining in detail the help needed. The more information you provide, the quicker we can address and resolve the issue.
-
The Priority field will usually populate after selecting a Category and Case Type. Try to leave it as is unless you have a stoppage in work (e.g., payroll blocker, security incident, site outage).
-
If there are any resources, impact lists, or forms that will help customer service complete the request, please upload them to the Attachments section and click the blue Save button beneath.
-
Last, click the white Save button in the top-right corner.
Viewing Cases
-
To find new, existing, or closed cases, use the Search bar or filter options in the Case Listing tile.
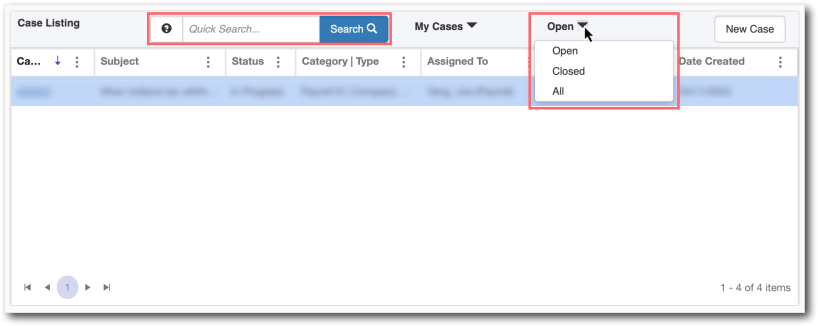
Note: You will only be able to view cases that you submit. You will not be able to see other cases for your company that colleagues may have submitted.
-
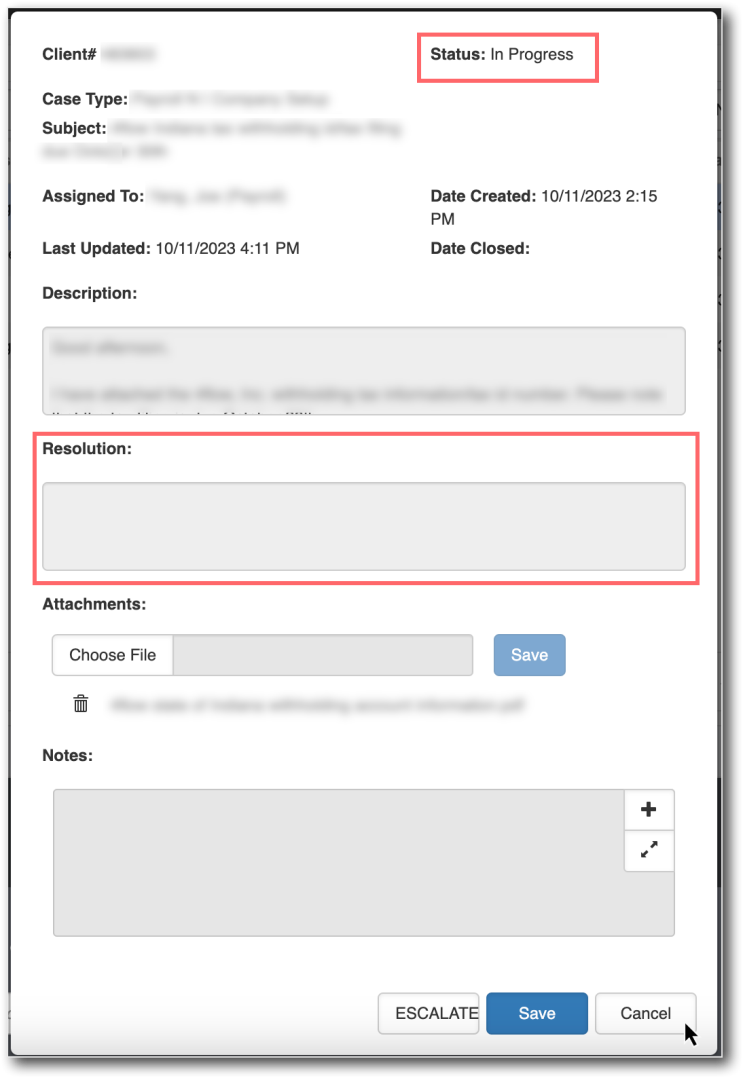
After selecting the case, a window will appear with all the case details that were initially entered when creating the case, as well as the Status, Resolution, if one has been found, and Notes. From here, you can add additional attachments, add notes, or Escalate the case.
Note: The Escalate button will only appear after the initial case submission.
-
When done viewing the case, click Cancel. If any attachments were added, click Save.
Adding Case Notes
Use case notes for additional details or follow-ups while waiting for an initial case discussion response from Namely. You can also use case notes to reopen previously completed cases for continued support.
-
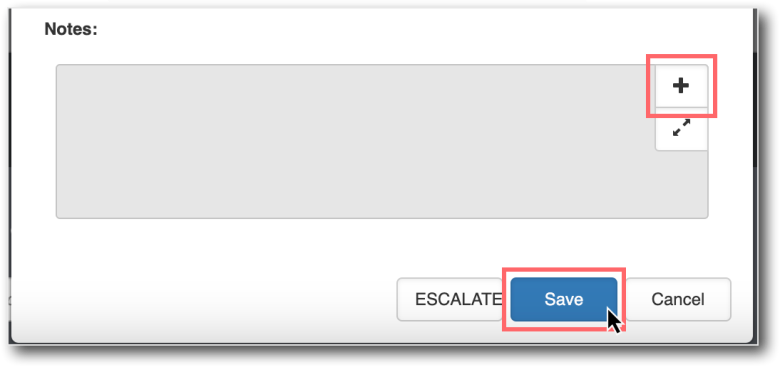
In the case details window, scroll down to the Notes section and click the Plus icon.
-
Type any notes you have about the case.
-
Click the Plus icon again.
-
Then, click Save.
Interacting with a Case Discussion
Case Discussion is the main channel for communication with the customer service team during case work, exclusively accessible through email threads and not visible in ClientSpace. To include a stakeholder in the Case Discussion, simply share their email address within the conversation and request the Service Consultant add them.
-
Once a case has been submitted, an email will be sent from an assigned Service Consultant to the email on file of the submitter. Navigate to it when it arrives.
-
There, click the Reply Here link to add case details, ask questions, or respond to any discussion the Service Consultant has.
Note: If the email hasn’t arrived from the Service Consultant yet and you need to update case information, add Notes to the case in ClientSpace. Make sure to check your spam folder for any ClientSpace communications and mark them as not spam.

Account Management
Submitting a Project
-
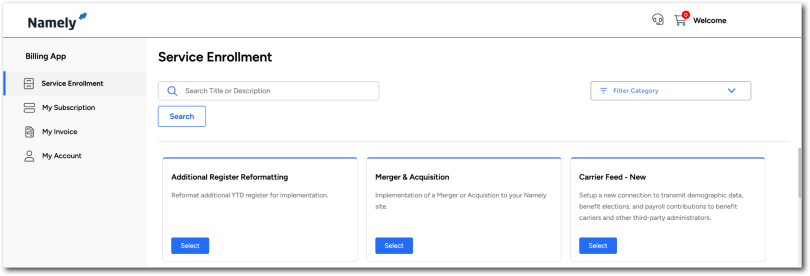
After clicking the Billing tab in Namely, a new window will appear for the Billing app featuring the Service Enrollment page. Navigate to the needed project by scrolling through the project options, using the Search bar at the top left, or using the filter options at the top right.
-
Click the Select button on the needed project.
-
Fill out the required fields in the Selected Project, and then click Add to Cart.
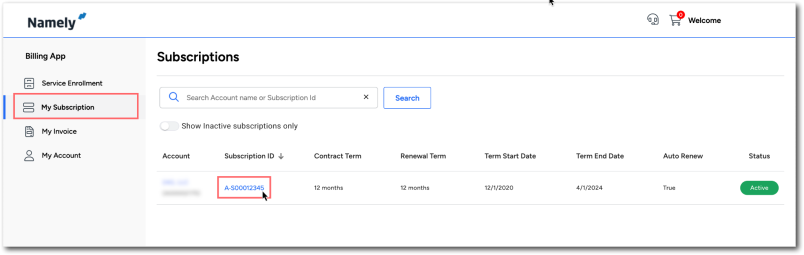
Viewing Subscription Details
-
Click My Subscription in the left navigation pane.
-
All subscriptions will appear with basic details listed. To view all subscription details, click the Subscription ID of the subscription you wish to view. This will list out basic details and all Active Products purchased under this subscription.
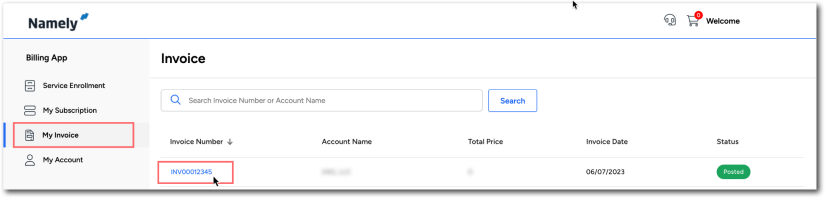
Viewing Invoices
-
Click My Invoice in the left navigation pane.
-
All invoices will appear with basic details listed. To view a specific invoice, click the Invoice Number of the invoice you wish to view.
Viewing Account Details
-
Click My Account in the left navigation pane.
-
The My Account Details page will appear with basic details and a list of all products purchased under the account’s subscriptions.
FAQ
-
How do I escalate a case? Click on the Case in the Case Listing tile, and when the window appears, click Escalate in the bottom right-hand corner.
-
Where are my old closed cases? Any cases that were closed prior to 09/08/2023 were not a part of the system migration into ClientSpace, so they will no longer be accessible.
-
Can I tag my colleague in a case? To include a colleague on an email thread, provide their contact info to the Service Consultant assigned to your case and request that they add your colleague.
-
How do I reopen a case? Please locate the case in ClientSpace and add a note informing the consultant that you require additional support with that particular subject matter.
-
Why can I only see the response in the email and not in CS? Email communications are not visible via ClientSpace, however case notes are.
-
What should I do if I need to follow up or provide an update on a case where a case discussion has not yet been initiated yet? Add a note to the case.
-
Why can’t I see the Billing option on my home page? Only Trusted Contacts with the Accounts Payable Contact will see this option. If not available, please update or follow-up with a Trusted Contact at your company to update your role if needed.
-
Where are my cases? They're not in the question mark anymore. Previously, cases were available by clicking the question mark icon at the top of your screen. Going forward, please go to Home > ClientSpace as this is the only place cases will be accessible going forward.
-
Can I see cases submitted by colleagues? At this time, you will only be able to see cases that you have submitted in ClientSpace.